A. Go to your Rapidweaver (RW5) preferences, and ensure that the option Consolidate CSS files is enabled. With RW6 this option is already enabled by default (please check this in the Advanced section). This makes exports of your project and uploading of your website faster and gives an improved Internet Explorer support too.
C. When you have questions about this theme feel free to post them on the RapidWeaver Forums (preferable), or drop me an email.
When you have questions about or issues with stacks or plugins (so not theme-related questions) please post them on the RW forums or send their developers an email.
D. This theme works fine in all modern browsers and on your iPhone/Android and iPad/tablet.
E. What is Responsive Design?
Users no longer just browse the web with desktop computers. Users now use mobile phones, small notebooks, tablet devices such as iPad to access the web. So the traditional fixed width design doesn't work any more. Web design needs to be adaptive. The layout needs to be automatically adjusted to fit all display resolution and devices.
Narrow for example your browser with this page, or check it on with iPhone/iPad (portrait mode)/Android device. Or have a look here.
WHAT'S IN THE MANUAL
1. How to install a theme2. Automatic Updates with Waterfall
3. Add a Background image to the Title and Slogan area
4. Logo
6. Font Awesome icons before the Page Title
7. ExtraContent
8. Responsive Image (banner) or Slideshow in ExtraContent3 (between Title/Slogan and Content)
9. Font Awesome Icons
10. More CSS
11. Searchbox
12. TextTime script
13. Date (US and European) script
14. Mail a Friend script
15. Using the Hide 'n' Show stack
16. Replace the words Category, Archives, Feeds (so the sidebar content) links
17. Title text in different colors
1. How to install a theme
Double-click on the theme file you received when you downloaded your purchase. The theme file will end with a “.rwtheme” extension. Once you double-click the theme file RapidWeaver will launch, if it wasn’t running already, and install the theme for you.After installation you’ll want to make sure you quit, and then restart RapidWeaver. This ensures that the app, and other plugins, all know you’ve installed a new theme and it will be visible to you in your theme drawer to choose for your project. In the theme drawer the theme show up with the name HV-ABC.
2. Automatic Updates with Waterfall
Easy, Automatic Theme Updating with the plugin Waterfall for both RapidWeaver® 5 & 6.The hassle of manually updating themes is a pain point every RapidWeaver user has run into as some point. Waterfall is your effortless theme management tool, specifically designed to help save you time and prevent the headaches all too often associated with theme updating.
With the Waterfall plugin you've always the latest version of a theme. I strongly recommend to use this plugin for updating themes!!
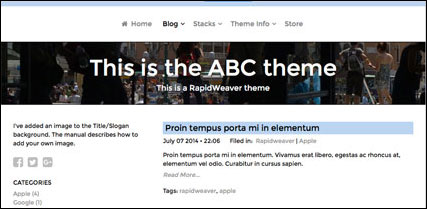
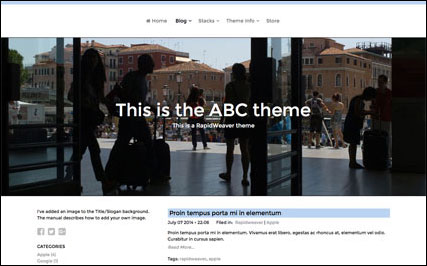
3. Add a background-image to the Title/Slogan
You can add your own image to the Title and Slogan Area. See this example.How to do this?
STEP 1. Drag your own image (any width or height is possible, I’d prefer a wide image, for example at least 1500px wide*) into the Resources of Rapidweaver. You’ll find an image in the download file so you can try it immediately: watch.jpg
* the images are repeated horizontally. So on a wide screen it’s possible that you can see a part of the image again. When you don’t like this, make the image wider or paste this in the Custom CSS to hide the horizontally repeat image effect:
STEP 2. Paste this in the Custom CSS (the image name is your-image.jpg in this example):#title {background-repeat: no-repeat;}
When you use the image in the download file the code will be this:#title {
background-image: url(%resource(your-image.jpg)%);}
Be sure that the image name is exactly the same as in the one in the Resources! Names are case-sensitive. Please don't use spaces in a name.#title {
background-image: url(%resource(watch.jpg)%);}
When your images are in an images folder in the Resources (for example with the name ‘images’), paste this in the Custom CSS:
When your image is warehoused (on a server) paste this in the Custom CSS:#title {
background-image: url(%resource(images/your-image.jpg)%);}
#title{
background-image: url(http://www.website.com/image.jpg);}
Try this working example:
Your image shows up in preview, but as you can see now there’s less space above and below the Title and Slogan:#title{
background-image: url(http://www.henkvrieselaar.com/Themes/elite/rw_common/themes/hv_elite/images/bulb.jpg);}
Create more space by adding a padding-top and a padding-bottom:
So paste for example this in the Custom CSS (numbers below are examples, it depends of the height of your image):
Now your background image has the same height on all screens (desktop, tablet, smartphone). With too much padding you’’ notice that your image is repeated at the top and bottom of the current image (see screenshot below). In this case decrease the padding until it fits.#title {
background-image: url(%resource(your-image.jpg)%);
padding-top: 130px; padding-bottom: 130px;}
STEP 3 (optional): when you’d like to decrease the height of the image on your iPad add this below the code above, for example:
And on your iPad (portrait mode) and on your iPhone add this too:@media screen and (max-width:768px) {
#title {padding-top: 100px;padding-bottom: 100px;}}
@media screen and (max-width:600px) {
#title {padding-top: 70px;padding-bottom: 70px;}}
@media screen and (max-width:480px) {
#title {padding-top: 50px;padding-bottom: 50px;}}
The padding-top and padding-bottom numbers are up to you, don’t change anything else You can test it by narrowing your browser window.
if you prefer the title appear more at the top of the image, decrease the padding-top and increase the padding-bottom, see this screenshot:
Add some text-shadow: Theme Styles > Miscellaneous > Add Text-Shadow to Title/Slogan.
STEP 4 (optional): you can add the top of your image to the breadcrumb background with this in the Custom CSS:
#breadbg {
background-image: url(%resource(your-image.jpg)%);
Example.
IMPORTANT: as you have noticed, the Title/Slogan/Logo are always vertically centered on the background-image, depending of your padding-top and padding-bottom. To keep the Title/Slogan/Logo centered do not check this button in the Theme Styles > Miscellaneous section:
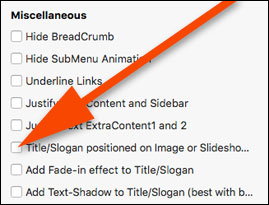
When you do this the Title/Slogan/Logo will have another vertical position.
Only enable this checkbox when your image or slideshow is in the ExtraContent3 area and you want the Title/Slogan/Logo on the image/slideshow (see Chapter 8).
When you prefer a responsive background image or slideshow to the Title/Slogan/Logo background go to Chapter 8.
FREE IMAGES: I’ve added some extra banner images, all 1600px wide but different heights. They are all free to use, without copyright (I’ve made them myself: http://www.henkvrieselaar.com/images/abc.zip
More images:
https://www.pexels.com
https://unsplash.com
4. Logo
The Title and Logo have a link with the index.html page of your website. Whatever base url is inserted in RapidWeaver > Site Setup > Web Address (with RW5), or Rapidweaver > General > Web Address (with RW6) will be the link.Drag your Logo into the Site Logo area.
By default the logo is hidden. Now go to the Theme Variations > Logo Position section and enable the option to display the logo. It will show up above the Title (Center, Left or Right).
Another option is to put your logo in for example the ExtraContent1 area (read Chapter 7). Now your logo has no link to the index.html, so you have to make a link manually.
Hide the Title in Theme Variations > Title FontSize > Hide Title and enable the logo when you want to replace the Title with your logo.
LOGO SIZE
I personally do not like a huge logo in a website, but that's up to you.
When you use a larger logo you can make it fluid:
MAKE A LOGO FLUID
With a big logo, it could be nicer to make it a bit smaller and/or fluid. How to do that?
When your logo image is has the same width or is wider than the selected width of the container (Theme Variations > Container Width), paste this in the Custom CSS:
Now with all devices (desktop, iPad and smartphone) the logo is fluid and has a 100% width.#logo img {height: auto;width:100%;}
Make a large logo smaller with for example this in the Custom CSS:
Only JPG, PNG or GIF images are allowed!#logo img {height: auto;width:30%;}
When you want to make your logo fluid only on iPad (portrait) and iPhone, paste this in the Custom CSS:
@media screen and (max-width:600px){#logo img {height: auto;width:100%;}}
6. Font Awesome Icon before the Page Title
By default there is no FontAwesome icon before a page Title. Personally I don't like the use of icons in a menu. Maybe only the Home icon. But that's up to you. Read Chapter 9 for more info about these icons.It's very simple to add an icon before a Page Title. Paste this before the Page Title for a Home icon:
<i class="fa fa-home"></i> Home
Note: the FontAwesome script is appearing in the browser title when the browser title is empty. To hide it put a title in the Page-Inspector > Browser Title.
IMPORTANT: When you copy a Font Awesome code be sure to replace the quotation marks " with ' when you use the built-in SiteMap page in your project too.
So not
but<i class="fa fa-home"></i>
<i class=‘fa fa-home’></i>

Need more space between the icon and the text? Paste this character entity between each code once or a few times. So for example:
<i class="fa fa-home"></i> Home
When you want to hide the icons on a page, paste this in the Custom CSS:
#nav .fa {display:none;}
7. ExtraContent
This theme is enabled with a very special feature called ExtraContent. ExtraContent allows you to add more content then RapidWeaver typically allows. It was developed by a small innovative group of RapidWeaver theme developers looking to extend the abilities of RapidWeaver beyond the two content areas typically allowed.This theme has 3EC areas*:
ExtraContent1: the EC1 area is at the top of the browser window. I would use EC1 for social media icons (with the built-in Font-Awesome icons or your own icons), a few words or text lines, a snippet (for example Date/Time, a Mail-A-Friend or whatever). Or a image or image slider stack.
ExtraContent2 is in the footer area, just above it.
You can add ExtraContent in two ways:
1. With these free stacks: ExtraContent stack or the ExtraContent Plus stack.
2. Or paste this in the Sidebar or Content area as plain text (RW > Edit > Paste as Plain Text) to show both EC areas* (and now - IMPORTANT -select the complete code and go to RapidWeaver > Format > Ignore Formatting. That pinkish hue means that portion has been marked as “Ignore formatting”):
<div id="myExtraContent1">This is the ExtraContent 1 container</div>
There is an EC snippet in the download file with a Plain Text lay-out.
TEXT-ALIGN: by default the EC1 and EC2 is aligned left. When you want to align for example the EC1 it right, paste this in the Custom CSS:
Or when you want to center the EC2:#myExtraContent1 {text-align: right;}
#myExtraContent2 {text-align: center;}
FONT-SIZE: select a font-size of the ExtraContent1 area in the Theme Styles. Or paste this in the Custom CSS (20px is an example):
*Actually there’s an ExtraContent3 area too for using header images or slideshows only. Read Chapter 8:#myExtraContent1 {font-size: 20px;}
8. Responsive Image (banner) or Slideshow in ExtraContent3 (between Title/Slogan and Content)
Read Chapter 3 when you like only one background image to the Title and Slogan Background!FREE IMAGES: I’ve added some extra banner images, all 1600px wide but different heights. They are all free to use, without copyright (I’ve made them myself: http://www.henkvrieselaar.com/abc.zip
More images:
https://www.pexels.com
https://unsplash.com
This chapter explains how to use the ExtraContent3 area for a responsive image or slideshow below the Title/Slogan/Logo area.
Or how to add this responsive image or slideshow as background of the Title/Slogan/Logo.
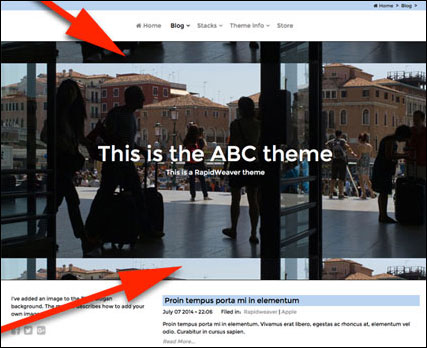
• ADD YOUR BANNER WITH A STACKS PAGE
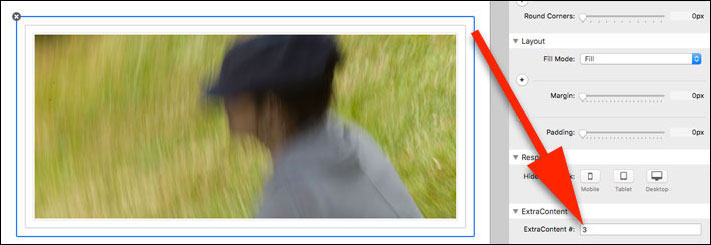
Step 1. With a Stacks page: drag an ExtraContent stack (free download) into a stacks page and select ExtraContent3 in the settings of the stack, see red arrow in image below.
Step 2. Now drag your own image (any width or height is possible, but preferable wide, for example at least 1600px wide) into this stack, see image below.
In preview your image shows up between the Title/Slogan and Content area.
When you use the previous version of the Stacks plugin (v. 2.7.2) your image may be a bit blurred in preview. To avoid this double-click on the image in the image stack and in the next screen uncheck the checkboxes Constrain Width and Constrain Height. This is not needed with the latest Stacks (v. 3) plugin.
• ADD YOUR BANNER WITH A NOT-STACKS PAGE
With a not-stacks page (Contact, Blog, Styled Text, Sitemap, etc.) or Stacks page you have 2 options: A or B.
A
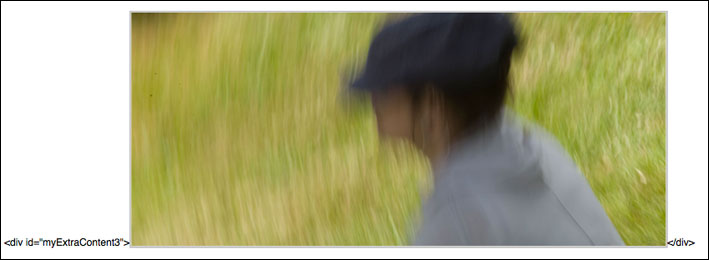
Step 1. paste this as plain text into the sidebar or content of your page:
<div id="myExtraContent3"></div>
Drag your image between <div id="myExtraContent3"> and </div> (see image below).
Add some text-shadow: Theme Styles > Miscellaneous > Add Text-Shadow to Title/Slogan.
B. And there’s another way to add your banner to a page:
Step 1. First drag your image into the Resources.
Step 2. Copy the code below and paste it into a RW page as Plain text (RW > Edit > Paste as Plain Text) (in the content or in the sidebar):
<div id="myExtraContent3"><img src="%resource(image1.jpg)%" ></div>
Replace the name image1.jpg in the code above with the name of your own image in the Resources. Be sure that the image name is exactly the same as in the one in the Resources! Names are case-sensitive. Please don't use spaces in a name.
When you put your image in a folder (for example the folder images) in the Resources, paste this:
<div id="myExtraContent3"><img src="%resource(images/image1.jpg)%" ></div>
In preview your image shows up.
Images can be located in your Resources (see above) or on a server (e.g. http://www.domain.com/images/img1.jpg). So when you choose to add an image on your server replace resources/img1.jpg in the code above with http://www.domain.com/images/image1.jpg (don't remove the quotation marks!). So:
Try this working example:<div id="myExtraContent3"><img src="http://www.domain.com/images/image1.jpg" ></div>
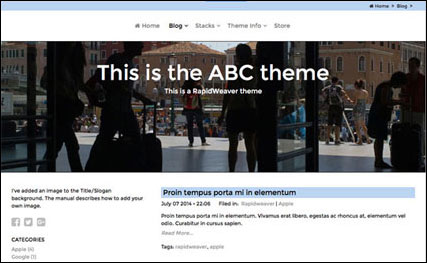
• ADD THE TITLE/SLOGAN IN THE IMAGE/SLIDESHOW<div id="myExtraContent3"><img src="http://static.pexels.com/wp-content/uploads/2014/05/black-and-white-city-house-378-825x550.jpg" ></div>
In Preview the Background Image or Slideshow show up below the Title/Slogan/Logo area. When you’d like the Title, Slogan and Logo in the Image or Slideshow check this checkbox in the Theme Styles > Miscellaneous section of the theme:

The Title/Slogan/Logo show up at the top of the image/slideshow, see screenshot below:
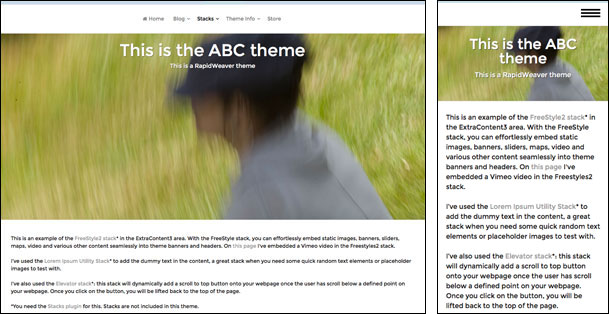
Please view this on smaller screens (or narrow your browser window) to judge whether the title and slogan remain within the picture. If not choose a smaller font-size or a taller image.
Do not check this checkbox when you choose for a background-image as explained in Chapter 3.
IMPORTANT: what about loading speed and image file size?
You can achieve this using your favorite image editor and choose "Save for Web & Devices". Set the DPI value at 72 and use a maximum height/width amount of for example 1500 pixels. The images in the theme are all 1600px wide and have different heights. Try to strive for a file size that is below 200kb, keep you image file size small and your website visitors happy.
IMAGES:Have you tried running the images through http://www.imgopt.com. This is an awesome tool from Yahoo which removes all the extra stuff that isn't needed for web images, reducing the size, but not the resolution.
• HOW TO ADD A SLIDESHOW IN THE EXTRACONTENT3
Adding a slide show in the ExtraContent3: drag your slide show stack in the ExtraContent stack and select EC3 in the settings of your stack. Add your images as described in the tutorial of the stack. When the slide show stack has an option for showing thumbnails I would hide that option. But that's up to you.
A great stack for this is the (free) Freestyle stack, but there are different other stacks for this, have a look at rapidweavercentral.info
Adding a slide show in the ExtraContent2 with the Weaverpix plugin or another slideshow plugin: select EC3 in the settings of the Weaverpix plugin. Add your images as described in the tutorial of the plugin.
Import a Weaverpix slideshow with the @import feature of the Pluskit plugin (or with the Global Content stack) into any other page.
Tutorial how to import a Weaverpix page (or any other page) with Pluskit into another page:
1. Add a Pluskit Page to your project.
2. Add a Weaverpix Page to your project. Add Photos and choose a theme. The Page Title of this page is for example weaverpix (any name is possible). Hide this page from the menu.
3. Now there are two options:
a. Add a Stacks2 page to your project where you want to show your Weaverpix slideshow, drag a text-stack into it and paste this in the stack to import the Weaverpix page: @import((weaverpix))
b. Instead of a Stacks2 page you can import a stack or contact form in any other page too (Blog, Styled Text, Filesharing, etc.).
Paste this line as plain text in the sidebar or content of the page where you want to import the Contact page: @import((weaverpix))
4. In Preview your slideshow shows up. Example.
9. Font Awesome Icons
The build-in Font Awesome Icons 4 are really fast and easy to use it anywhere in your website!Make sure you have got CSS Consolidation turned on in RapidWeaver preferences. If you see squares instead of icons, this is a sure-sign that you've not turned on consolidation, and therefore the links to the icons are broken.
Please visit the this website to view a list of all FontAwesome 4 icons available:
A.Click on an icon of your choosing from the list. For example the Facebook Official icon:
<i class="fa fa-facebook-official"></i>
B. Simply copy and paste the code for the icon that has generated on the page next to the content where you would like the icon to appear. Never remove the quotation marks! You can paste this anywhere: in the content or sidebar, in the ExtraContent or footer, before a blog or filesharing title or wherever.
C. Once placed in your project file, highlight the entire code and click Clear Formatting under Format at the top left of your screen. The font icon will now display in preview.
D. In the Theme Styles you can change the color of the icons in the content, sidebar and ExtraContent.
Other color? Paste this in the Custom CSS:
#ff0000 is the HTML color for red. Other HTML colors..fa {color:#ff0000 !important;}
E. Add a bit space behind an icon with this character entity after each code , once or a few times. So for example:
<i class="fa fa-facebook-official"></i>
Or before the icon:
<i class="fa fa-facebook-official"></i>
Add a bit space between two icons with this character entity between each code , once or a few times. So for example:
<i class="fa fa-facebook-official"></i> <i class="fa fa-twitter-square"></i>
F. By default the font-size of these icons is the same as the selected font-size of Content, ExtraContent, etc. There are two options to increase the size of these icons:
To increase icon sizes relative to their container, use the fa-lg (33% increase), fa-2x, fa-3x, fa-4x, or fa-5x classes. So for example:
<i class="fa fa-camera-retro fa-lg"></i> fa-lg
<i class="fa fa-camera-retro fa-2x"></i> fa-2x
<i class="fa fa-camera-retro fa-3x"></i> fa-3x
<i class="fa fa-camera-retro fa-4x"></i> fa-4x
<i class="fa fa-camera-retro fa-5x"></i> fa-5x
Or increase the size of an icon with this in the Custom CSS (Page-Inspector > Header > CSS), any font-size is possible, for example 32px:
.fa {font-size: 32px;}
G. add a link to your FontAwesome icon (for example to your Facebook page):
<a href="#"><i class="fa fa-facebook-official"></i></a>
Replace the # in this code with the page URL of your icon and the website will open in the same window. When you replace the # with http://www.facebook.com/jjohnson" target="_blank (so add only target="_blank) the website opens in a new window, so:
<a href="http://www.facebook.com/jjohnson" TARGET="_blank"><i class="fa fa-camera-retro fa-lg"></i></a>
An email-address is possible too. Replace the # in the code with this: mailto:johndoe@mac.com
This is an example with an envelope icon:
<a href="mailto:johndoe@mac.co"><i class="fa fa-envelope"></i></a>
Don’t remove the quotation marks!
H. When you put a FontAwesome icon in an ExtraContent area, for example the EC1 area, paste this in the Sidebar or Content as plain text (RW > Edit > Paste as Plain Text):
<div id ="myExtraContent1"><i class="fa fa-facebook-official"></i></div>
In Preview your icon shows up in the ExtraContent1 area, above the Menu. Be sure always to end with the </div> tag!!!
Another option is to paste the icon code in the free ExtraContent stack and select EC1 in the settings of the stack.
Replace myExtraContent1 with another EC area (2 or 3) in the code above when you prefer it in another EC area.
I. With this the text and the icon are inline and have the same font-size, for example this Cog icon:
<i class="fa fa-cog"></i> This is a Cog Icon
As you can see I’ve added some space between the icon and the text line too. Be sure that when you start with a </div...> tag you always have to end with the </div> tag!
• YOUR OWN ICONS (IMAGES)
It’s not needed to use these font awesome icons. You can also add real images (jpg, gif, png) as icons in your webpages and make a link to a page.
10. More CSS
You can add all css-codes below in the Custom CSS:Line-Height Content and Sidebar
Increase the line-height (default 1.5):
#contentContainer #content, #sidebarContainer #sidebar {line-height: 1.8;}
Font-Size Blog Entry
With this in the Custom CSS the links in the content, sidebar and ExtraContent are underlined:
(30px is an example).blog-entry-title {font-size: 30px;}
Font-Size Footer
Change the font-size of the footer with this:
14px is an example, any font-size is possible.#footer {font-size: 14px;}
Center thumbnails and text in the built-in Photo Album Page
With this you can center the thumbnails warp in a built-in Photo Album Page. It looks best when you hide the Sidebar:
Background pattern to the Content, Menu and ExtraContent1.album-description,.album-wrapper,.album-title {text-align: center;}
.thumbnail-wrap {display: inline-block;float: none;}
By default you can choose a color to the background in the Theme Styles > Main Background Colors > Menu and Content Background.
Adding a pattern is possible too. How to add your own pattern:
Step 1: Download a pattern from the internet (see below).
Step 2: Add your pattern, for example pattern1.jpg, to the Resources and add this to the Custom CSS:
Background pattern to the Title and Slogan area#ec1bg,#content-wrapper,#header,.mean-container .mean-bar {background: url(%resource(pattern1.jpg)%) repeat fixed;}
By default you can choose a color to the background in the Theme Styles > Main Background Colors > Title and Slogan Background.
Adding a pattern is possible too. How to add your own pattern:
Step 1: Download a pattern from the internet (see below).
Step 2: Add your pattern, for example pattern2.jpg, to the Resources and add this to the Custom CSS:
Background pattern to the Footer area#title {background: url(%resource(pattern2.jpg)%) repeat fixed;}
By default you can choose a color to the background in the Theme Styles > Main Background Colors > Footer Background.
Adding a pattern is possible too. How to add your own pattern:
Step 1: Download a pattern from the internet (see below).
Step 2: Add your pattern, for example pattern3.jpg, to the Resources and add this to the Custom CSS:
Background pattern to the ExtraContent2 areabody {background: url(%resource(pattern3.jpg)%) repeat fixed;}
By default you can choose a color to the background in the Theme Styles > Main Background Colors > ExtraContent2 Background.
Adding a pattern is possible too. How to add your own pattern:
Step 1: Download a pattern from the internet (see below).
Step 2: Add your pattern, for example pattern4.jpg, to the Resources and add this to the Custom CSS:
#ec2bg {background: url(%resource(pattern4.jpg)%) repeat fixed;}
Any pattern name is possible, but be sure that the name of the pattern is exactly the same as the name in the css. Don’t use spaces in an image name.
Download patterns here:
http://subtlepatterns.com
http://www.squidfingers.com/patterns/
and many other websites. It’s really fun do add a pattern.
11. Searchbox
ExampleYou can add a searchbox in the sidebar, content or in any ExtraContent area (EC1, EC2, EC3), How to do this, for example in the EC2 (above the Title)?
A. Add a RapidSearch Page to your project. Read the Rapidsearch Users Guide:
"In order for RapidSearch to generate a search form for you, it must know your "search engine ID", which can only be created via Google's website.
RapidSearch v5.0 has a button in the main window that, when clicked, will open your browser and take you to Google where you can create your custom search engine. Once you've done so, copy and paste the search engine ID into RapidSearch. You can then use the plugin just like you have in the past, although some options have been changed (and we'll continue to update them) to match the new Google API.
Please also keep in mind that with the changes, the search field will not work in RW's Preview mode until you have first published your site".
B. Name the RapidSearch page folder for example "search". And then, paste this code as plain text (RW > Edit > Paste as Plain Text) in the content or sidebar:
<!-- Replace the url below with the url of your RapidSearch page--> <!-- When you prefer another word for Search replace it by your own word or by a FontAwesome icon. -->
<form action="http://www.url-of-your-website.com/search" method="get"> <fieldset> <input type="text" name="q" value=""/> <input type="submit" value="Search"/>
</fieldset> </form>
C. When you put this code between <div id="myExtraContent2"> and </div> it shows up in the EC2 area above the Title.
Another option is to put the code in the free ExtraContent stack and enable 1 in the settings of this stack.
Notes:
• Do not add index.html or index.php because for some reasons RapidSearch won't work with the absolute url.
• When you add the tag <br> at the end of the line <input type="text" name="query" value=""/> the word ‘Search’ goes to the next line.
So it will be this:
<!-- Replace the url below with the url of your RapidSearch page--> <!-- When you prefer another word for Search replace it by your own word or by a FontAwesome icon -->
<form action="http://www.url-of-your-website.com/search" method="get"> <fieldset> <input type="text" name="q" value=""/><br> <input type="submit" value="Search"/>
</fieldset> </form>
• Important: Highlight the entire code and click Clear Formatting, then Ignore Formatting under Format at the top left of your screen. That pinkish hue means that portion has been marked as “Ignore formatting”.
D. When you would like to replace the word 'Search' with a FontAwesome icon (see image below), first replace the word Search with this 
So it will be this:
<form action="http://www.url-of-your-website.com/search" method="get"> <fieldset> <input type="text" name="query" value=""/> <input type="submit" value=""/>
</fieldset> </form>
• Important: Highlight the entire code and click Clear Formatting, then Ignore Formatting under Format at the top left of your screen. That pinkish hue means that portion has been marked as “Ignore formatting”.
Select a color in the Theme Styles > Colours > SearchBox …
And now paste this in the Custom CSS for a bigger font-size (16px is an example):
fieldset input[type="submit"] {font-size: 16px !important;}
12. TextTime script
ExamplePaste the code below as plain text (RW > Edit > Paste as Plain Text) in the Sidebar or Content. You can replace the names of the months and the days in your own language. Do not remove the quotation marks!
<script language="JavaScript">
function number(x) {
if (x==1) return "one"; if (x==2) return "two"; if (x==3) return "three";
if (x==4) return "four"; if (x==5) return "five"; if (x==6) return "six";
if (x==7) return "seven"; if (x==8) return "eight"; if (x==9) return "nine";
if (x==10) return "ten"; if (x==11) return "eleven"; if (x==12) return "twelve";
return x; //default
}
function ishtime(h,m) {
h = number(h)
<!-- Below you can translate the text in your own language -->
if (m<=3 || m>57) return h+" o'clock";
if (m<=7) return "five past "+h;
if (m<=12) return "ten past "+h;
if (m<=17) return "quarter past "+h;
if (m<=23) return "twenty past "+h;
if (m<=28) return "twenty-five past "+h;
if (m<=33) return "half past "+h;
if (m<=38) return "twenty-five to "+h;
if (m<=43) return "twenty to "+h;
if (m<=48) return "quarter to "+h;
if (m<=53) return "ten to "+h;
if (m<=58) return "five to "+h;
return "h:m";
}
function daytime(h) {
<!-- Below you can translate the text in your own language -->
if (!h || h>21) return " at night"
if (h<12) return " in the morning";
if (h<=17) return " in the afternoon";
return " in the evening"; // default
}
function ish(h,m) {
if (!h && !m) {
time = new Date()
h = time.getHours()
m = time.getMinutes()
}
z = daytime(h);
h = h % 12 // fix to 12 hour clock
if (m>57 && time.getSeconds()>30) m++;
if (m>60) m=0
if (m>33) h++
if (h>12) h = 1
if (h==0) h = 12
<!-- Below you can translate the text in your own language -->
return "It's now about "+ishtime(h,m)+z+"."
}document.writeln(ish().fontcolor(""),"<P>")
</script>
Important: select the complete code and go to RapidWeaver > Format > Ignore Formatting. That pinkish hue means that portion has been marked as “Ignore formatting”.
When you put this code between <div id="myExtraContent1"> and </div> it shows up in the EC1 area below the header.
Another option is to put the code above in the free ExtraContent stack and choose 1 in the settings of this stack.
13. Date (US and European) script
ExamplePaste the code below as plain text (RW > Edit > Paste as Plain Text) in the Sidebar or Content when you prefer a US Date:
<script>
var mydate=new Date()
var year=mydate.getYear()
if (year < 1000)
year+=1900
var day=mydate.getDay()
var month=mydate.getMonth()
var daym=mydate.getDate()
if (daym<10)
daym="0"+daym
<!-- Replace the name of the Months and Days below in your own language -->
var dayarray=new Array("Sunday","Monday","Tuesday","Wednesday","Thursday","Friday","Saturday")
var montharray=new Array("January","February","March","April","May","June","July","August","September","October","November","December")
document.write(""+dayarray[day]+", "+montharray[month]+" "+daym+", "+year+"")
</script>
• Important: select the complete code and go to RapidWeaver > Format > Ignore Formatting. That pinkish hue means that portion has been marked as “Ignore formatting”.
The code explains which parts can be changed.
This is the code when you prefer a European Date:
<script>
var mydate=new Date()
var year=mydate.getYear()
if (year < 1000)
year+=1900
var day=mydate.getDay()
var month=mydate.getMonth()
var daym=mydate.getDate()
if (daym<10)
daym="0"+daym
<!-- Replace the name of the Months and Days below in your own language -->
var dayarray=new Array("Sunday","Monday","Tuesday","Wednesday","Thursday","Friday","Saturday")
var montharray=new Array("January","February","March","April","May","June","July","August","September","October","November","December")
document.write(""+dayarray[day]+ " "+daym+" "+montharray[month]+", "+year+"")
</script>
• Important: select the complete code and go to RapidWeaver > Format > Ignore Formatting. That pinkish hue means that portion has been marked as “Ignore formatting”.
The code explains which parts can be changed.
When you put this code between <div id="myExtraContent1"> and </div> it shows up in the EC1 area below the header).
Another option is to put the code above in the free ExtraContent stack and choose 1 in the settings of this stack.
14. Mail a Friend script
Paste the code below as plain text in the Sidebar or Content. The code explains which parts can be changed:<!-- Replace the text "Click here to email this page to a friend" in your own text. In this example the word 'here' is a link -->
Click <A href="javascript:mailpage()">here<A> to email this page to a friend
<script language="javascript">
function mailpage()
{
<!-- Replace the text "Check out ". -->
mail_str = "mailto:?subject=Check out " + document.title;
<!-- Replace the text "I thought you might be interested in this page" and ". You can view it at" -->
mail_str += "&body=I thought you might be interested in this page " + document.title;
mail_str += ". You can view it at " + location.href;
location.href = mail_str;
}
</script>
You can replace the red and green parts in the code above in your own text. The word in green is the linktext.
Do not remove the quotation marks!
Important: select the complete code and go to RapidWeaver > Format > Ignore Formatting. That pinkish hue means that portion has been marked as “Ignore formatting”.
When you put this code between <div id="myExtraContent1"> and </div> it shows up in the EC1 area below the header.
Another option is to put the code above in the free ExtraContent stack and choose 1 in the settings of this stack.
15. Using the Hide 'n' Show stack
A. With the Hide 'n' Show stack (not included in the theme) your visitor can show and hide a part of your webpage (for example the ExtraContent1 area). See this example.How to do this (Effect and Speed are up to you):
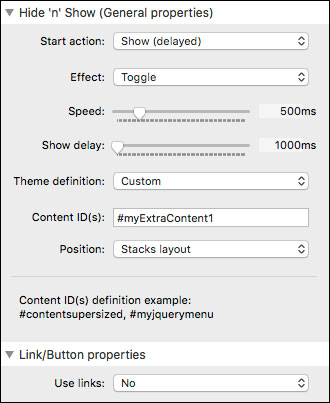
In the settings of the HnS stack select these settings (image below). The ID in this example is: #myExtraContent1
B. Add a Hide ’n’ Show stack and put this ID in the Content ID(s) for the image in the ExtraContent3 (see image below): #myExtraContent3
In this example the effect is Slide Toggle of the image in the ExtraContent3 (image below left)
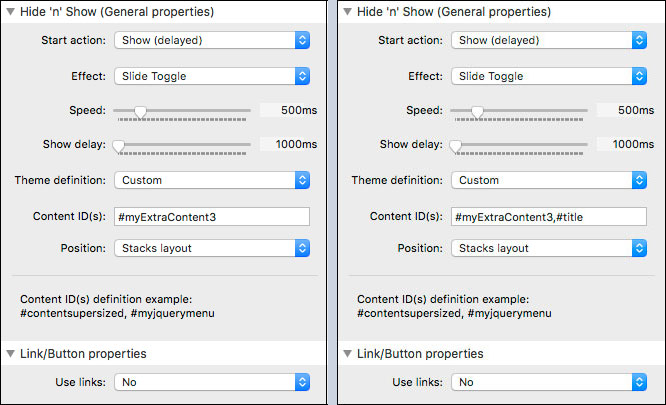
When the Title/Slogan is on the image in the ExtraContent3 put these ID’s in the Content ID(s) (image right above):
#myExtraContent3,#title
This is an example with only #title in the Content ID(s).
C. Add a new Hide ’n’ Show stack and put this ID in the Content ID(s) for the content: #content
In this example the effect is Slide Toggle, but that’s up to you.

There are many more options with this stack.
16. Replace the words Category, Archives, Feeds (so the sidebar content) links
By default the sidebar contents in the built-in Blog page shows the English names (CATEGORIES, ARCHIVES, etc, see screenshot below):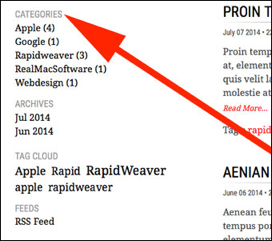
With this in the Custom CSS section you can replace those names with another word in your own language:
#blog-categories:before {content:"Categories";}
#blog-archives:before {content:"Archives";}
#blog-rss-feeds:before {content:"Feeds";}
ul.blog-tag-cloud:before{content:"Tag cloud";}
Only replace the words, don't remove the quotation marks!
Select a color of these words in the Theme Variations > Colours > Blog Categories/Archives/Feeds/Tag text.
17. Title text in different colors
In the Theme Styles > Title, Slogan and Menu Colours you can choose a colour for the title.
The home page of my demosite shows the title in a black font-color, but the word abc is red. I've pasted this in the Title area (in Site-Setup):
This is the <span style="color:#FF0000">abc</span> Rapidweaver theme
#FF0000 is the HTML-colorcode for red. More colorcodes here: http://www.computerhope.com/htmcolor.htm
Of course you can add more codes to the title, even when you prefer every letter another color.
-------------------------------------------------------------------------------------------
HV ABC may not be resold or redistributed without the express written permission of Henk Vrieselaar:
2016